GraphQL - JQuery 集成
Web 应用程序以异步方式(在后台)发送和检索数据。AJAX 允许网站在不刷新页面的情况下将内容加载到屏幕上。jQuery 提供了多种用于 AJAX 功能的方法,从而使使用 AJAX 变得更加简单。在本章中,我们将学习如何将 GraphQL 与 jQuery 集成。
考虑一个使用客户端-服务器架构的应用程序。我们可以构建一个前端网页,向 GraphQL server 请求数据。该网页将使用 jQuery 向 GraphQL server 发起 AJAX 调用。
要将 GraphQL 与 jQuery 集成,让我们检查 GraphiQL 的请求头并理解请求参数。
启动 hello-world 应用程序(有关相关说明,请参阅第 6 章)。在 GraphiQL 窗口中输入 GraphQL 查询 {greeting}。右键单击并检查,或在 Chrome 中按 (Ctrl + Shift + I) 转到网络选项卡,如下所示 −

从简单的 hello-world 示例中,我们可以了解到使用的 http method 是 POST。现在在浏览器中向下滚动到头部部分,查看 request payload。
单击 view code 后,你将在 Chrome 的请求 payload 部分看到以下内容。
{"query":"{\n greeting\n}","variables":null,"operationName":null}
还要注意请求 URL,http://localhost:9000/graphql,这是客户端应用程序应该调用的。
示例说明
让我们通过分步过程了解如何将 GraphQL 与 jQuery 集成。
设置服务器
我们将通过以下步骤学习如何设置服务器 −
步骤 1 − 下载并安装项目所需的依赖项
创建一个名为 jquery-server-app 的文件夹。从终端切换到 jquery-server-app 目录。遵循“环境设置”章节中解释的步骤 3 到 5。
步骤 2 − 创建 Schema
在项目文件夹 jquery-server-app 中添加 schema.graphql 文件,并添加以下代码 −
type Query
{
   greeting: String
   sayHello(name:String!):String
}
该文件定义了两个查询 greeting 和 sayHello。sayHello 查询接受一个 string 参数并返回另一个 string。sayHello() 函数的参数不能为空。
步骤 3 − 创建 Resolvers
在项目文件夹中创建 resolvers.js 文件,并添加以下代码 −
const Query =
{
   greeting: () => 'Hello GraphQL  From  !!' ,
   sayHello:(root,args,context,info) =>  `Hi ${args.name} GraphQL server says Hello to you!!`
}
module.exports = {Query}
这里,greeting 和 sayHello 是两个 resolvers。在 sayHello resolver 中,传递给 name 参数的值可以通过 args 访问。要在模块外部访问 resolver 函数,必须使用 module.exports 导出 Query 对象。
步骤 4 − 运行应用程序
创建 server.js 文件。请参阅“环境设置”章节中的步骤 8。在终端中执行命令 npm start。服务器将在 9000 端口启动并运行。这里,我们使用 GraphiQL 作为客户端来测试应用程序。
打开浏览器并输入 URL http://localhost:9000/graphiql。在编辑器中输入以下查询 −
{
   greeting,
   sayHello(name:"Mohtashim")
}
服务器的响应如下所示 −
{
   "data": {
      "greeting": "Hello GraphQL From  !!",
      "sayHello": "Hi Mohtashim GraphQL server says Hello to you!!"
   }
}
设置客户端
由于我们已经设置好了服务器,现在我们将学习如何设置客户端。
步骤 1 − 在当前项目文件夹外创建一个名为 jquery-client-app 的新文件夹
首先,我们将在项目文件夹外创建一个名为 jquery-client-app 的文件夹。
步骤 2 − 为 jQuery 集成创建一个 HTML 页面 index.html
我们将在 jQuery 中创建一个客户端应用,并调用两个方法。以下是 index.html 文件的代码。该 index.html 页面在点击 Greet 和 SayHello 按钮时向服务器发送请求。我们将使用 $.ajax() function 进行异步请求。
<!DOCTYPE html>
<html>
<head>
<script src = "https://ajax.googleapis.com/ajax/libs/jquery/3.3.1/jquery.min.js"></script>
<script>
$(document).ready(function() {
$("#btnSayhello").click(function() {
const name = $("#txtName").val();
console.log(name);
$("#SayhelloDiv").html('loading....');
$.ajax({url: "http://localhost:9000/graphql",
contentType: "application/json",type:'POST',
data: JSON.stringify({ query:`{
sayHello(name:"${name}")}`
}),
success: function(result) {
console.log(JSON.stringify(result))
$("#SayhelloDiv").html("<h1>"+result.data.sayHello +"</h1>");
}
});
});
$("#btnGreet").click(function() {
$("#greetingDiv").html('loading....');
//https://kannan-first-graphql-app.herokuapp.com/graphql
$.ajax({url: "http://localhost:9000/graphql",
contentType: "application/json",
type:'POST',
data: JSON.stringify({
query:`{greeting}`
}),
success: function(result) {
$("#greetingDiv").html("<h1>"+result.data.greeting+"</h1>");
}
});
});
});
</script>
</head>
<body>
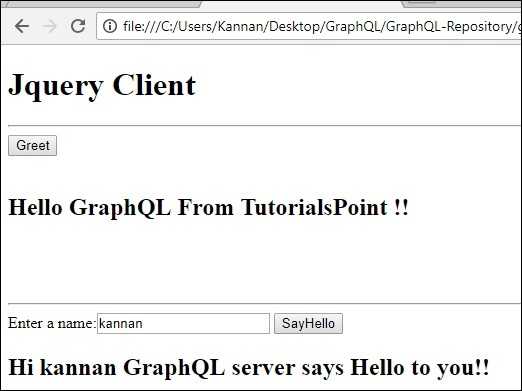
<h1>Jquery Client </h1>
<hr/>
<section>
<button id = "btnGreet">Greet</button>
<br/> <br/>
<div id = "greetingDiv"> </div>
</section>
<br/> <br/> <br/>
<hr/>
<section>
Enter a name:<input id = "txtName" type = "text" value = "kannan"/>
<button id = "btnSayhello">SayHello</button>
<div id = "SayhelloDiv"> </div>
</section>
</body>
</html>
在浏览器中打开此文件并点击按钮查看响应。输出将如下所示 −