Angular - 使用 ViewContainerRef
动态创建和渲染组件的第二种方式是使用 ViewContainerRef。其他组件或指令使用它来获取对应于它们在 DOM 中位置的视图容器的引用。通过这种方式,ViewContainerRef 有助于在该特定位置动态创建和插入组件。
示例 - ViewContainerRef 的使用
让我们创建一个实时应用程序,以两种不同的格式(table 和 gallery)显示一组员工。我们将创建两个 component,一个以 table 格式显示员工,另一个以 gallery 格式显示。然后我们将创建一个 host component,它将动态加载 table based component 或 gallery based component。
步骤 1: 创建一个 interface,用于在多个动态 component 中保存公共数据
$ ng generate interface DynData
CREATE src/app/dyn-data.ts (29 bytes)
步骤 2: 创建一个动态 component,DynList。该 component 的目的是以 gallery 方式列出员工。
$ ng generate component DynList
CREATE src/app/dyn-list/dyn-list.css (0 bytes)
CREATE src/app/dyn-list/dyn-list.html (23 bytes)
CREATE src/app/dyn-list/dyn-list.spec.ts (567 bytes)
CREATE src/app/dyn-list/dyn-list.ts (209 bytes)
步骤 3: 创建一个动态 component,DynTable。该 component 的目的是以 tabular 格式列出员工。
$ ng generate component DynTable
CREATE src/app/dyn-table/dyn-table.css (0 bytes)
CREATE src/app/dyn-table/dyn-table.html (24 bytes)
CREATE src/app/dyn-table/dyn-table.spec.ts (574 bytes)
CREATE src/app/dyn-table/dyn-table.ts (213 bytes)
步骤 4: 创建一个 host component,DynHost。该 component 的目的是根据配置托管其中一个 component,即 DynList 或 DynTable。
$ ng generate component DynHost
CREATE src/app/dyn-host/dyn-host.css (0 bytes)
CREATE src/app/dyn-host/dyn-host.html (23 bytes)
CREATE src/app/dyn-host/dyn-host.spec.ts (567 bytes)
CREATE src/app/dyn-host/dyn-host.ts (209 bytes)
步骤 5: 接下来,打开 interface DynData 并添加一个数组属性 data
DynData.ts
export interface DynData {
   data : any[]
}
步骤 6: 接下来,打开 DynList component 并实现 DynData interface。
DynList.ts
import { Component } from '@angular/core';
import { DynData } from '../dyn-data';

@Component({
   selector: 'app-dyn-list',
   imports: [],
   templateUrl: './dyn-list.html',
   styleUrl: './dyn-list.css',
})
export class DynList implements DynData {
   data: any[] = []
}
这里,
导入了 DynData interface 并在 class 定义中实现它
按照 DynData interface 规范包含了 data 属性
步骤 7: 接下来,打开 component 的 template 并将数据渲染为 item 列表
dyn-list.html
<div class="gallery">
    @for (item of data; track $index) {
   <div class="card">
      <div class="container">
         <h4><b>{{ item.name }}</b></h4>
         <p>{{ item.role }}</p>
      </div>
   </div>
   }
</div>
这里,
data 保存具有 name 和 role 两个属性的员工列表
使用 @for 将员工显示为 card 列表
步骤 8: 接下来,打开 component 的 styles 并添加如下所示的必要 CSS −
dyn-list.css
.gallery {
   display: flex;
   flex-wrap: wrap;
   justify-content: left;
   gap: 10px;
}

.card {
   flex-basis: 200px;
   box-shadow: 0 4px 8px 0 rgba(0,0,0,0.2);
}

.card:hover {
   box-shadow: 0 8px 16px 0 rgba(0,0,0,0.2);
}

.container {
   padding: 2px 16px;
   max-width: 200px;
}
这里,我们使用了 CSS 的 flex 特性来以 gallery 格式显示员工
步骤 9: 接下来,打开 DynTable component 并实现 DynData interface。
DynTable.ts
import { Component } from '@angular/core';
import { DynData } from '../dyn-data';

@Component({
   selector: 'app-dyn-table',
   imports: [],
   templateUrl: './dyn-table.html',
   styleUrl: './dyn-table.css',
})
export class DynTable implements DynData {
   data: any[] = []
}
这里,
导入了 DynData interface 并在 class 定义中实现它
按照 DynData interface 规范包含了 data 属性
步骤 10: 接下来,打开 component 的 template 并将数据渲染为 item 列表
Dyn-Table.html
<table class="employees">
   <thead>
      <tr>
         <th>Name</th>
         <th>Role</th>
      </tr>
   </thead>
   <tbody>
    @for (item of data; track $index) {
      <tr>
         <td>{{ item.name }}</td>
         <td>{{ item.role }}</td>
      </tr>
    }
   </tbody>
</table>
这里,
data 保存具有 name 和 role 两个属性的员工列表
使用 @for 将员工渲染为 html table 中的行
步骤 11: 接下来,打开 component 的 styles 并添加如下所示的必要 CSS −
.employees {
   border-collapse: collapse;
   width: 400px;
}

.employees td, .employees th {
   padding: 8px;
}

.employees tbody tr:nth-child(even){background-color: #f2f2f2;}

.employees tbody tr:hover {background-color: #ddd;}

.employees thead th {
   padding-top: 12px;
   padding-bottom: 12px;
   text-align: left;
   background-color: brown;
   color: white;
}
步骤 12: 接下来,打开 DynHost component 的 template 并包含如下所示的 ng-container −
<ng-container #container></ng-container>
这里,我们展示了 ng-container 的用法。
步骤 13: 接下来,打开 DynHostComponent 并导入必要的 classes
import { AfterViewInit, Component, Input, ViewChild, ViewContainerRef } from '@angular/core';
步骤 14: 接下来,导入 interface、list component、table component 和 directive
import { DynData } from '../dyn-data';
import { DynList } from '../dyn-list/dyn-list';
import { DynTable } from '../dyn-table/dyn-table';
步骤 15: 在 class 声明中实现 AfterViewInit life cycle hook
export class DynHost implements AfterViewInit {
}
步骤 16: 声明一个 input property,用于从用户获取 format 信息(table / list)。
@Input() format: string = 'list'
步骤 17: 声明一个 property,data 并设置示例数据
private data = [
   {
      'name': 'John',
      'role': "Manager"
   },
   {
      'name': 'Peter',
      'role': "Marketing Intern"
   },
   {
      'name': 'Mary',
      'role': "Technical Intern"
   },
   {
      'name': 'Jack',
      'role': "Sales Manager"
   },
   {
      'name': 'Jessica',
      'role': "Delivery Head"
   },
]
步骤 18: 使用 @ViewChild 从 template 中获取 ng-container view component
@ViewChild('container', { read: ViewContainerRef }) container!: ViewContainerRef;
步骤 19: 在 ngAfterViewInit life cycle hook 中实现动态创建 component 并加载到适当位置的实际逻辑
ngAfterViewInit() {

   if(this.format == 'table') {
      const compRef = this.container.createComponent<DynData>(DynTable);
      compRef.instance.data = this.data;
   } else {
      const compRef = this.container.createComponent<DynData>(DynList);
      compRef.instance.data = this.data;
   }
}
步骤 20: host component 的完整代码如下,
import { AfterViewInit, Component, Input, OnInit, ViewChild, ViewContainerRef } from '@angular/core';

import { DynData } from '../dyn-data';
import { DynList } from '../dyn-list/dyn-list';
import { DynTable } from '../dyn-table/dyn-table';

@Component({
   selector: 'app-dyn-host',
   templateUrl: './dyn-host.html',
   styleUrls: ['./dyn-host.css']
})
export class DynHost implements AfterViewInit {
   @Input() format: string = 'table'
   @ViewChild('container', { read: ViewContainerRef }) container!: ViewContainerRef;

   private data = [
   {
      'name': 'John',
      'role': "Manager"
   },
   {
      'name': 'Peter',
      'role': "Marketing Intern"
   },
   {
      'name': 'Mary',
      'role': "Technical Intern"
   },
   {
      'name': 'Jack',
      'role': "Sales Manager"
   },
   {
      'name': 'Jessica',
      'role': "Delivery Head"
   },
  ]

   ngAfterViewInit() {

      if(this.format == 'table') {
         const compRef = this.container.createComponent<DynData>(DynTable);
         compRef.instance.data = this.data;
      } else {
         const compRef = this.container.createComponent<DynData>(DynList);
         compRef.instance.data = this.data;
      }
   }
}
步骤 21: 接下来,打开 app component 的 template 并包含 host component。
app.html
<app-dyn-host format="table" />
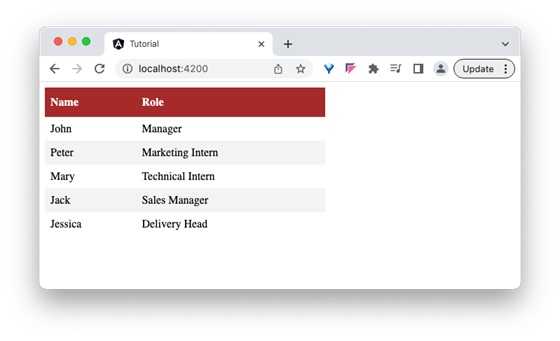
这里,我们指示 host component 以 tabular 格式渲染员工数据。host component 将动态创建 DynTableComponent 并注入到 host component template 中。
步骤 22: 接下来,运行应用程序,你将看到员工数据以 tabular 格式显示,如下所示 −
步骤 23: 接下来,打开 app component 的 template 并将 format 更改为 gallery。
<app-dyn-host format="gallery" />
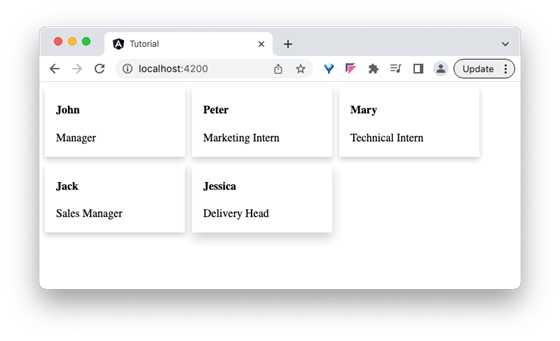
这里,我们指示 host component 以 gallery 格式渲染员工数据。host component 将动态创建 DynListComponent 并注入到 host component template 中。
输出
步骤 24: 接下来,运行应用程序,你将看到员工数据以 gallery 格式显示,如下所示 −