Angular - 样式绑定
什么是样式绑定?
动态 web 应用程序通常具有动态样式,这些样式在应用程序运行时设置。样式绑定是一种特殊的绑定,用于动态地将值绑定到 HTML 元素的 style 属性。
在本章中,我们将详细了解样式绑定的更多细节。
使用样式绑定的方式
Angular 提供了四种不同的方式来实现样式绑定。每种样式绑定类型都支持特殊功能。四种方式如下:
- 单一样式绑定
- 带单位的单一样式绑定
- 多样式绑定
- 通过自定义样式对象进行多样式绑定
在接下来的章节中,我们将逐一学习。
单一样式绑定
在单一样式绑定中,CSS 样式的属性名应附加到 style. 字符串后,并用方括号包围。例如,可以使用 [style.width] 来设置 HTML 元素的宽度,如下所示 −
<div [style.width]="<template variable>">
   <!-- content -->
</div>
带单位的单一样式绑定
在带单位的单一样式绑定中,CSS 样式的属性名应附加到 style. 字符串后,单位(如 .px)应附加到 CSS 样式的属性名后,并用方括号包围。例如,可以使用 [style.width.px] 来设置 HTML 元素的宽度(单位为 px),如下所示 −
<div [style.width.px]="<template variable>">
   <!-- content -->
</div>
多样式绑定
在多样式绑定中,style 字符串应被方括号包围,值应包含适当的 CSS 样式。例如,可以使用 [style] 来设置 HTML 元素的宽度和高度,如下所示 −
<div [style]="<template variable>">
   <!-- content -->
</div>
这里,模板变量的一个示例输出是 width: 100px; height: 200px
使用对象的多样式绑定
在使用对象的多样式绑定中,style 字符串应被方括号包围,值应设置为类型为 Record<string, string> 的对象,该对象具有适当的 CSS 属性名(或转换为 camelCase)和对应的值。例如,可以使用 [style] 来设置 HTML 元素的宽度和高度,如下所示 −
<div [style]="<objects as template variable>">
   <!-- content -->
</div>
这里,一个示例对象如下,
{
   width: '100px',
   height: '100px'
}
实现样式绑定
让我们创建一个简单的注册表单来理解属性绑定。我们的注册表单将包含以下三个输入字段和一个提交注册表单的按钮。1. Username 2. Password 3. Confirm password
步骤 1: 使用 Angular CLI 创建一个新的应用 my-app,如下所示 −
ng new my-app
步骤 2: 使用 Angular CLI 创建一个新的注册表单组件 RegisterForm,如下所示 −
ng generate component RegisterForm
步骤 3: 接下来,打开注册表单组件的模板文件,并添加包含用户名、密码和确认密码的表单。
register-form.html
<div>
   <form method="post">
      <div class="container">
         <label for="username"><b>Username</b></label>
         <input type="text" name="username" required>

         <label for="password"><b>Password</b></label>
         <input type="password" name="password" required>

         <label for="confirm_password"><b>Confirm Password</b></label>
         <input type="password" name="confirm_password" required>

         <button type="submit">Register</button>
      </div>
   </form>
</div>
步骤 4: 打开注册表单组件的 CSS 样式文件,并使用 CSS 为表单添加样式,如下所示 −
register-form.css
.container {
   padding: 15px;
}

input[type=text], input[type=password] {
   width: 100%;
   padding: 10px 20px;
   margin: 10px 0;
   display: inline-block;
   border: 1px solid #ccc;
   box-sizing: border-box;
}

button {
   background-color: blue;
   color: white;
   padding: 15px 20px;
   margin: 10px 0;
   border: none;
   cursor: pointer;
   width: 100%;
}
步骤 5: 将我们的注册表单组件包含在应用模板文件 app.html 中:
app.html
<app-register-form />
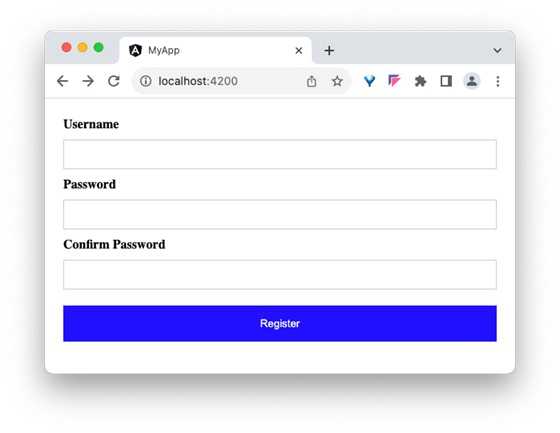
输出
步骤 6: 运行应用并测试注册表单。
步骤 7: 接下来,让我们尝试使用样式绑定为按钮应用样式。
步骤 8: 在组件中添加一个包含必要值的对象,如下所示 −
btnStyle: Record<string, string> = {
   'backgroundColor': 'purple',
   'color': 'white',
   'padding': '15px 20px',
   'margin': '10px 0',
   'border': 'none',
   'cursor': 'pointer',
   'width': '100%'
}
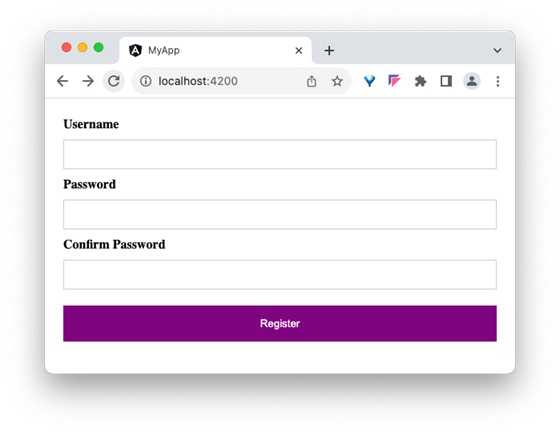
在这里,我们将按钮的背景色从蓝色更改为紫色。还要注意,背景色样式属性的名称 background-color 使用了 camelCase 格式,即 backgroundColor。
步骤 9: 接下来,从组件的样式文件中移除按钮样式。
步骤 10: 接下来,通过样式绑定将样式对象分配给按钮。
<button type="submit" [style]="btnStyle">Register</button>
步骤 11: 组件的完整代码如下所示:
register-form.ts
import { Component } from '@angular/core';

@Component({
  selector: 'app-register-form',
  imports: [],
  templateUrl: './register-form.html',
  styleUrl: './register-form.css',
})
export class RegisterFormComponent {
   btnStyle: Record<string, string> = {
      'backgroundColor': 'purple',
      'color': 'white',
      'padding': '15px 20px',
      'margin': '10px 0',
      'border': 'none',
      'cursor': 'pointer',
      'width': '100%'
   }
}
步骤 12: 组件模板的完整代码如下所示:
register-form.html
<div>
   <form method="post">
      <div class="container">
         <label for="username"><b>Username</b></label>
         <input type="text" name="username" required>

         <label for="password"><b>Password</b></label>
         <input type="password" name="password" required>

         <label for="confirm_password"><b>Confirm Password</b></label>
         <input type="password" name="confirm_password" required>

         <button type="submit" [style]="btnStyle" >Register</button>
      </div>
   </form>
</div>
输出
步骤 13: 运行应用并查看输出。
Conclusion
Style binding 使开发者能够轻松地为任何 HTML 元素的 style 属性设置复杂值,可以通过纯样式或自定义样式对象来实现。