Spring Boot - Tomcat 部署
通过使用 Spring Boot 应用程序,我们可以创建一个 war 文件并部署到 web 服务器中。本章将介绍如何创建 WAR 文件并将 Spring Boot 应用程序部署到 Tomcat web 服务器。
Spring Boot Servlet Initializer
传统的部署方式是让 Spring Boot 应用程序的 @SpringBootApplication class 继承 SpringBootServletInitializer class。Spring Boot Servlet Initializer class 文件允许你在使用 Servlet Container 启动应用程序时进行配置。
用于 JAR 文件部署的 Spring Boot Application class 文件代码如下所示 −
DemoApplication.java
package com..demo;

import org.springframework.boot.SpringApplication;
import org.springframework.boot.autoconfigure.SpringBootApplication;

@SpringBootApplication
public class DemoApplication {
   public static void main(String[] args) {
      SpringApplication.run(DemoApplication.class, args);
   }
}
为了支持 WAR 文件部署,我们需要继承 SpringBootServletInitializer class。Spring Boot Application class 文件的代码如下所示 −
DemoApplication.java
package com..demo;

import org.springframework.boot.SpringApplication;
import org.springframework.boot.autoconfigure.SpringBootApplication;
import org.springframework.boot.builder.SpringApplicationBuilder;
import org.springframework.boot.web.servlet.support.SpringBootServletInitializer;

@SpringBootApplication
public class DemoApplication  extends SpringBootServletInitializer {
   @Override
   protected SpringApplicationBuilder configure(SpringApplicationBuilder application) {
      return application.sources(DemoApplication.class);
   }
   public static void main(String[] args) {
      SpringApplication.run(DemoApplication.class, args);
   }
}
设置 Main Class
在 Spring Boot 中,我们需要在构建文件中指定启动的 main class。为此,你可以使用以下代码片段 −
对于 Maven,在 pom.xml 的 properties 中添加启动类,如下所示 −
<properties>
   <java.version>21</java.version>
   <start-class>com..demo.DemoApplication</start-class>
</properties>
对于 Gradle,在 build.gradle 中添加 main class 名称,如下所示 −
mainClassName="com..demo.DemoApplication"
将打包 JAR 更新为 WAR
我们需要使用以下代码将打包 JAR 更新为 WAR −
对于 Maven,在 pom.xml 中添加 WAR 打包,如下所示 −
<packaging>war</packaging>
对于 Gradle,在 build.gradle 中添加 application plugin 和 war plugin,如下所示 −
apply plugin: 'war'
apply plugin: 'application'
现在,让我们编写一个简单的 Rest Endpoint,从 Tomcat 返回字符串 Hello World。要编写 Rest Endpoint,我们需要将 Spring Boot web starter dependency 添加到构建文件中。
对于 Maven,在 pom.xml 中添加 Spring Boot starter dependency,使用如下代码 −
<dependency>
   <groupId>org.springframework.boot</groupId>
   <artifactId>spring-boot-starter-web</artifactId>
</dependency>
对于 Gradle,在 build.gradle 中添加 Spring Boot starter dependency,使用如下代码 −
dependencies {
   compile('org.springframework.boot:spring-boot-starter-web')
}
现在,在 Spring Boot Application 类文件中编写一个简单的 Rest Endpoint,使用如下代码 −
DemoApplication.java
package com..demo;

import org.springframework.boot.SpringApplication;
import org.springframework.boot.autoconfigure.SpringBootApplication;
import org.springframework.boot.builder.SpringApplicationBuilder;
import org.springframework.boot.web.servlet.support.SpringBootServletInitializer;
import org.springframework.web.bind.annotation.GetMapping;
import org.springframework.web.bind.annotation.RestController;

@SpringBootApplication
@RestController
public class DemoApplication  extends SpringBootServletInitializer {
   @Override
   protected SpringApplicationBuilder configure(SpringApplicationBuilder application) {
      return application.sources(DemoApplication.class);
   }
   public static void main(String[] args) {
      SpringApplication.run(DemoApplication.class, args);
   }

   @GetMapping(value = "/")
   public String hello() {
      return "Hello World from Tomcat";
   }
}
打包您的应用
现在,使用以下 Maven 和 Gradle 命令将您的应用打包为 WAR 文件,以便部署到 Tomcat 服务器中 −
对于 Maven,使用命令 mvn package 来打包您的应用。然后,WAR 文件将被创建,您可以在 target 目录中找到它 −
D:\Projects\demo>mvn package
您将看到类似下面的结果:
[INFO] Scanning for projects...
[INFO]
[INFO] ----------------------< com.:demo >-----------------------
[INFO] Building demo 0.0.1-SNAPSHOT
[INFO]   from pom.xml
[INFO] --------------------------------[ war ]---------------------------------
[INFO]
[INFO] --- resources:3.3.1:resources (default-resources) @ demo ---
[INFO] Copying 1 resource from src\main\resources to target\classes
[INFO] Copying 0 resource from src\main\resources to target\classes
[INFO]
[INFO] --- compiler:3.14.0:compile (default-compile) @ demo ---
[INFO] Nothing to compile - all classes are up to date.
[INFO]
[INFO] --- resources:3.3.1:testResources (default-testResources) @ demo ---
[INFO] skip non existing resourceDirectory D:\Projects\demo\src\test\resources
[INFO]
[INFO] --- compiler:3.14.0:testCompile (default-testCompile) @ demo ---
[INFO] Nothing to compile - all classes are up to date.
[INFO]
[INFO] --- surefire:3.5.4:test (default-test) @ demo ---
[INFO] Using auto detected provider org.apache.maven.surefire.junitplatform.JUnitPlatformProvider
[INFO]
[INFO] -------------------------------------------------------
[INFO]  T E S T S
[INFO] -------------------------------------------------------
[INFO] Running com..demo.DemoApplicationTests
13:58:37.865 [main] INFO org.springframework.test.context.support.AnnotationConfigContextLoaderUtils -- Could not detect default configuration classes for test class [com..demo.DemoApplicationTests]: DemoApplicationTests does not declare any static, non-private, non-final, nested classes annotated with @Configuration.
13:58:37.999 [main] INFO org.springframework.boot.test.context.SpringBootTestContextBootstrapper -- Found @SpringBootConfiguration com..demo.DemoApplication for test class com..demo.DemoApplicationTests

  .   ____          _            __ _ _
 /\\ / ___'_ __ _ _(_)_ __  __ _ \ \ \ \
( ( )\___ | '_ | '_| | '_ \/ _` | \ \ \ \
 \\/  ___)| |_)| | | | | || (_| |  ) ) ) )
  '  |____| .__|_| |_|_| |_\__, | / / / /
 =========|_|==============|___/=/_/_/_/

 :: Spring Boot ::                (v3.5.6)

2025-09-28T13:58:38.533+05:30  INFO 27944 --- [demo] [           main] c.t.demo.DemoApplicationTests            : Starting DemoApplicationTests using Java 24.0.1 with PID 27944 (started by mahes in D:\Projects\demo)
2025-09-28T13:58:38.535+05:30  INFO 27944 --- [demo] [           main] c.t.demo.DemoApplicationTests            : No active profile set, falling back to 1 default profile: "default"
2025-09-28T13:58:39.713+05:30  INFO 27944 --- [demo] [           main] c.t.demo.DemoApplicationTests            : Started DemoApplicationTests in 1.561 seconds (process running for 2.685)
Mockito is currently self-attaching to enable the inline-mock-maker. This will no longer work in future releases of the JDK. Please add Mockito as an agent to your build as described in Mockito's documentation: https://javadoc.io/doc/org.mockito/mockito-core/latest/org.mockito/org/mockito/Mockito.html#0.3
WARNING: A Java agent has been loaded dynamically (C:\Users\mahes\.m2\repository\net\bytebuddy\byte-buddy-agent\1.17.7\byte-buddy-agent-1.17.7.jar)
WARNING: If a serviceability tool is in use, please run with -XX:+EnableDynamicAgentLoading to hide this warning
WARNING: If a serviceability tool is not in use, please run with -Djdk.instrument.traceUsage for more information
WARNING: Dynamic loading of agents will be disallowed by default in a future release
Java HotSpot(TM) 64-Bit Server VM warning: Sharing is only supported for boot loader classes because bootstrap classpath has been appended
[INFO] Tests run: 1, Failures: 0, Errors: 0, Skipped: 0, Time elapsed: 2.972 s -- in com..demo.DemoApplicationTests
[INFO]
[INFO] Results:
[INFO]
[INFO] Tests run: 1, Failures: 0, Errors: 0, Skipped: 0
[INFO]
[INFO]
[INFO] --- war:3.4.0:war (default-war) @ demo ---
[INFO] Packaging webapp
[INFO] Assembling webapp [demo] in [D:\Projects\demo\target\demo-0.0.1-SNAPSHOT]
[INFO] Processing war project
[INFO] Copying webapp resources [D:\Projects\demo\src\main\webapp]
[INFO] Building war: D:\Projects\demo\target\demo-0.0.1-SNAPSHOT.war
[INFO]
[INFO] --- spring-boot:3.5.6:repackage (repackage) @ demo ---
[INFO] Replacing main artifact D:\Projects\demo\target\demo-0.0.1-SNAPSHOT.war with repackaged archive, adding nested dependencies in BOOT-INF/.
[INFO] The original artifact has been renamed to D:\Projects\demo\target\demo-0.0.1-SNAPSHOT.war.original
[INFO] ------------------------------------------------------------------------
[INFO] BUILD SUCCESS
[INFO] ------------------------------------------------------------------------
[INFO] Total time:  8.455 s
[INFO] Finished at: 2025-09-28T13:58:43+05:30
[INFO] ------------------------------------------------------------------------
同样,对于 Gradle,您可以使用命令 gradle clean build 来打包您的应用。然后,您的 WAR 文件将被创建,您可以在 build/libs 目录下找到它。
部署到 Tomcat
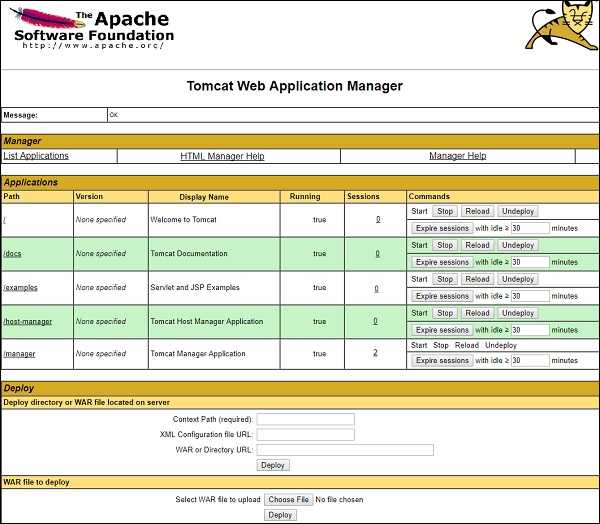
现在,运行 Tomcat Server,并将 WAR 文件部署到 webapps 目录下。查看这里的截图以更好地理解 −

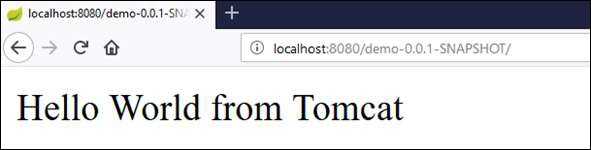
部署成功后,在浏览器中访问 URL http://localhost:8080/demo-0.0.1-SNAPSHOT/,观察输出结果将如下截图所示 −
用于此目的的完整代码如下所示。
pom.xml
<?xml version="1.0" encoding="UTF-8"?>
<project xmlns="http://maven.apache.org/POM/4.0.0" xmlns:xsi="http://www.w3.org/2001/XMLSchema-instance"
   xsi:schemaLocation="http://maven.apache.org/POM/4.0.0 https://maven.apache.org/xsd/maven-4.0.0.xsd">
   <modelVersion>4.0.0</modelVersion>
   <parent>
      <groupId>org.springframework.boot</groupId>
      <artifactId>spring-boot-starter-parent</artifactId>
      <version>3.5.6</version>
      <relativePath/> <!-- lookup parent from repository -->
   </parent>
   <groupId>com.</groupId>
      <artifactId>demo</artifactId>
      <version>0.0.1-SNAPSHOT</version>
      <packaging>war</packaging>
      <name>demo</name>
      <description>Demo project for Spring Boot</description>
      <url/>
      <licenses>
         <license/>
      </licenses>
      <developers>
         <developer/>
      </developers>
      <scm>
         <connection/>
         <developerConnection/>
         <tag/>
         <url/>
      </scm>
      <properties>
         <java.version>21</java.version>
         <start-class>com..demo.DemoApplication</start-class>
      </properties>
   <dependencies>
      <dependency>
         <groupId>org.springframework.boot</groupId>
         <artifactId>spring-boot-starter-web</artifactId>
      </dependency>
      <dependency>
         <groupId>org.springframework.boot</groupId>
         <artifactId>spring-boot-starter-test</artifactId>
         <scope>test</scope>
      </dependency>
   </dependencies>
   <build>
      <plugins>
         <plugin>
            <groupId>org.springframework.boot</groupId>
            <artifactId>spring-boot-maven-plugin</artifactId>
         </plugin>
      </plugins>
   </build>
</project>
build.gradle
buildscript {
   ext {
      springBootVersion = '3.5.6'
   }
   repositories {
      mavenCentral()
   }
dependencies {
      classpath("org.springframework.boot:spring-boot-gradle-plugin:${springBootVersion}")
   }
}

apply plugin: 'java'
apply plugin: 'eclipse'
apply plugin: 'org.springframework.boot'
apply plugin: 'war'
apply plugin: 'application'

group = 'com.'
version = '0.0.1-SNAPSHOT'
sourceCompatibility = 21
mainClassName = "com..demo.DemoApplication"

repositories {
   mavenCentral()
}
dependencies {
   compile('org.springframework.boot:spring-boot-starter-web')
   testCompile('org.springframework.boot:spring-boot-starter-test')
}
主 Spring Boot application class 文件的代码如下所示 −
package com..demo;

import org.springframework.boot.SpringApplication;
import org.springframework.boot.autoconfigure.SpringBootApplication;
import org.springframework.boot.builder.SpringApplicationBuilder;
import org.springframework.boot.web.servlet.support.SpringBootServletInitializer;
import org.springframework.web.bind.annotation.GetMapping;
import org.springframework.web.bind.annotation.RestController;

@SpringBootApplication
@RestController
public class DemoApplication  extends SpringBootServletInitializer {
   @Override
   protected SpringApplicationBuilder configure(SpringApplicationBuilder application) {
      return application.sources(DemoApplication.class);
   }
   public static void main(String[] args) {
      SpringApplication.run(DemoApplication.class, args);
   }

   @GetMapping(value = "/")
   public String hello() {
      return "Hello World from Tomcat";
   }
}