Spring Boot - 异常处理
在 API 中处理异常和错误,并向客户端发送适当的响应,对企业级应用来说非常重要。在本章中,我们将学习如何在 Spring Boot 中处理异常。
在进行异常处理之前,让我们先了解以下注解。
Controller Advice
@ControllerAdvice 是一个注解,用于全局处理异常。
您可以使用以下代码创建一个 @ControllerAdvice class 来全局处理异常 −
ProductExceptionController.java
package com..demo.exception;

import org.springframework.web.bind.annotation.ControllerAdvice;

@ControllerAdvice
public class ProductExceptionController {
}
异常处理器
@ExceptionHandler 是一个用于处理特定异常并向客户端发送自定义响应的注解。
定义一个继承 RuntimeException 类的类。
ProductNotfoundException.java
package com..demo.exception;

public class ProductNotfoundException extends RuntimeException {
   private static final long serialVersionUID = 1L;
}
你可以定义 @ExceptionHandler 方法来处理异常,如下所示。此方法应用于编写 Controller Advice 类文件。
@ExceptionHandler(value = ProductNotfoundException.class)
public ResponseEntity<Object> exception(ProductNotfoundException exception) {
}
现在,使用以下代码从 API 中抛出异常。
@PutMapping(value = "/products/{id}")
public ResponseEntity<Object> updateProduct() {
   throw new ProductNotfoundException();
}
处理异常的完整代码如下所示。在本例中,我们使用 PUT API 更新产品。在更新产品时,如果未找到产品,则返回响应错误消息“Product not found”。注意,ProductNotFoundException 异常类应继承 RuntimeException。
ProductNotfoundException.java
package com..demo.exception;

public class ProductNotfoundException extends RuntimeException {
   private static final long serialVersionUID = 1L;
}
以下是用于全局处理异常的 Controller Advice 类。我们可以在此类文件中定义任意 Exception Handler 方法。
ProductExceptionController
package com..demo.exception;

import org.springframework.http.HttpStatus;
import org.springframework.http.ResponseEntity;
import org.springframework.web.bind.annotation.ControllerAdvice;
import org.springframework.web.bind.annotation.ExceptionHandler;

@ControllerAdvice
public class ProductExceptionController {
   @ExceptionHandler(value = ProductNotfoundException.class)
   public ResponseEntity<Object> exception(ProductNotfoundException exception) {
      return new ResponseEntity<>("Product not found", HttpStatus.NOT_FOUND);
   }
}
以下是用于更新 Product 的 Product Service API controller 文件。如果未找到 Product,则抛出 ProductNotFoundException 类。
ProductServiceController.java
package com..demo.controller;

import java.util.HashMap;
import java.util.Map;

import org.springframework.http.HttpStatus;
import org.springframework.http.ResponseEntity;
import org.springframework.web.bind.annotation.PathVariable;
import org.springframework.web.bind.annotation.PutMapping;
import org.springframework.web.bind.annotation.RequestBody;
import org.springframework.web.bind.annotation.RestController;

import com..demo.exception.ProductNotfoundException;
import com..demo.model.Product;

@RestController
public class ProductServiceController {
   private static Map<String, Product> productRepo = new HashMap<>();
   static {
      Product honey = new Product();
      honey.setId("1");
      honey.setName("Honey");
      productRepo.put(honey.getId(), honey);

      Product almond = new Product();
      almond.setId("2");
      almond.setName("Almond");
      productRepo.put(almond.getId(), almond);
   }

   @PutMapping(value = "/products/{id}")
   public ResponseEntity<Object> updateProduct(@PathVariable("id") String id, @RequestBody Product product) {
      if(!productRepo.containsKey(id))throw new ProductNotfoundException();
      productRepo.remove(id);
      product.setId(id);
      productRepo.put(id, product);
      return new ResponseEntity<>("Product is updated successfully", HttpStatus.OK);
   }
}
主 Spring Boot 应用程序类文件的代码如下 −
DemoApplication.java
package com..demo;

import org.springframework.boot.SpringApplication;
import org.springframework.boot.autoconfigure.SpringBootApplication;

@SpringBootApplication
public class DemoApplication {
   public static void main(String[] args) {
      SpringApplication.run(DemoApplication.class, args);
   }
}
Product 的 POJO class 代码如下 −
Product.java
package com..demo.model;

public class Product {
   private String id;
   private String name;

   public String getId() {
      return id;
   }
   public void setId(String id) {
      this.id = id;
   }
   public String getName() {
      return name;
   }
   public void setName(String name) {
      this.name = name;
   }
}
Maven build pom.xml 的代码如下 −
pom.xml
<?xml version="1.0" encoding="UTF-8"?>
   <project xmlns="http://maven.apache.org/POM/4.0.0" xmlns:xsi="http://www.w3.org/2001/XMLSchema-instance"
   xsi:schemaLocation="http://maven.apache.org/POM/4.0.0 https://maven.apache.org/xsd/maven-4.0.0.xsd">
   <modelVersion>4.0.0</modelVersion>
   <parent>
      <groupId>org.springframework.boot</groupId>
      <artifactId>spring-boot-starter-parent</artifactId>
      <version>3.5.6</version>
      <relativePath/> <!-- lookup parent from repository -->
   </parent>
   <groupId>com.</groupId>
   <artifactId>demo</artifactId>
   <version>0.0.1-SNAPSHOT</version>
   <name>demo</name>
   <description>Demo project for Spring Boot</description>
   <url/>
   <licenses>
      <license/>
   </licenses>
   <developers>
      <developer/>
   </developers>
   <scm>
      <connection/>
      <developerConnection/>
      <tag/>
      <url/>
   </scm>
   <properties>
      <java.version>21</java.version>
   </properties>
   <dependencies>
      <dependency>
         <groupId>org.springframework.boot</groupId>
         <artifactId>spring-boot-starter-web</artifactId>
      </dependency>
      <dependency>
         <groupId>org.springframework.boot</groupId>
         <artifactId>spring-boot-starter-test</artifactId>
         <scope>test</scope>
      </dependency>
   </dependencies>
   <build>
      <plugins>
         <plugin>
            <groupId>org.springframework.boot</groupId>
            <artifactId>spring-boot-maven-plugin</artifactId>
         </plugin>
      </plugins>
   </build>
</project>
Gradle Build build.gradle 的代码如下 −
build.gradle
buildscript {
   ext {
      springBootVersion = '3.5.6'
   }
   repositories {
      mavenCentral()
   }
   dependencies {
      classpath("org.springframework.boot:spring-boot-gradle-plugin:${springBootVersion}")
   }
}
apply plugin: 'java'
apply plugin: 'eclipse'
apply plugin: 'org.springframework.boot'

group = 'com.'
version = '0.0.1-SNAPSHOT'
sourceCompatibility = 21

repositories {
   mavenCentral()
}
dependencies {
   compile('org.springframework.boot:spring-boot-starter-web')
   testCompile('org.springframework.boot:spring-boot-starter-test')
}
你可以使用 Maven 或 Gradle 命令创建可执行 JAR 文件并运行 Spring Boot 应用程序 −
对于 Maven,可以使用以下命令 −
mvn clean install
BUILD SUCCESS 后,你可以在 target 目录下找到 JAR 文件。
对于 Gradle,可以使用以下命令 −
gradle clean build
BUILD SUCCESSFUL 后,你可以在 build/libs 目录下找到 JAR 文件。
你可以使用以下命令运行 JAR 文件 −
java jar <JARFILE>
这将在 Tomcat 端口 8080 上启动应用程序,如下所示 −
  .   ____          _            __ _ _
 /\\ / ___'_ __ _ _(_)_ __  __ _ \ \ \ \
( ( )\___ | '_ | '_| | '_ \/ _` | \ \ \ \
 \\/  ___)| |_)| | | | | || (_| |  ) ) ) )
  '  |____| .__|_| |_|_| |_\__, | / / / /
 =========|_|==============|___/=/_/_/_/

 :: Spring Boot ::                (v3.5.6)

[2025-09-28T16:18:37Z] [org.springframework.boot.StartupInfoLogger] [main] [53] [INFO ] Starting DemoApplication using Java 21.0.6 with PID 15736 (D:\Projects\demo\target\classes started by mahes in D:\Projects\demo)
[2025-09-28T16:18:37Z] [org.springframework.boot.SpringApplication] [main] [652] [INFO ] No active profile set, falling back to 1 default profile: "default"
[2025-09-28T16:18:38Z] [org.springframework.boot.web.embedded.tomcat.TomcatWebServer] [main] [111] [INFO ] Tomcat initialized with port 8080 (http)
[2025-09-28T16:18:38Z] [org.apache.juli.logging.DirectJDKLog] [main] [168] [INFO ] Initializing ProtocolHandler ["http-nio-8080"]
[2025-09-28T16:18:38Z] [org.apache.juli.logging.DirectJDKLog] [main] [168] [INFO ] Starting service [Tomcat]
[2025-09-28T16:18:38Z] [org.apache.juli.logging.DirectJDKLog] [main] [168] [INFO ] Starting Servlet engine: [Apache Tomcat/10.1.46]
[2025-09-28T16:18:38Z] [org.apache.juli.logging.DirectJDKLog] [main] [168] [INFO ] Initializing Spring embedded WebApplicationContext
[2025-09-28T16:18:38Z] [org.springframework.boot.web.servlet.context.ServletWebServerApplicationContext] [main] [301] [INFO ] Root WebApplicationContext: initialization completed in 1102 ms
[2025-09-28T16:18:39Z] [org.apache.juli.logging.DirectJDKLog] [main] [168] [INFO ] Starting ProtocolHandler ["http-nio-8080"]
[2025-09-28T16:18:39Z] [org.springframework.boot.web.embedded.tomcat.TomcatWebServer] [main] [243] [INFO ] Tomcat started on port 8080 (http) with context path '/'
[2025-09-28T16:18:39Z] [org.springframework.boot.StartupInfoLogger] [main] [59] [INFO ] Started DemoApplication in 2.169 seconds (process running for 2.668)
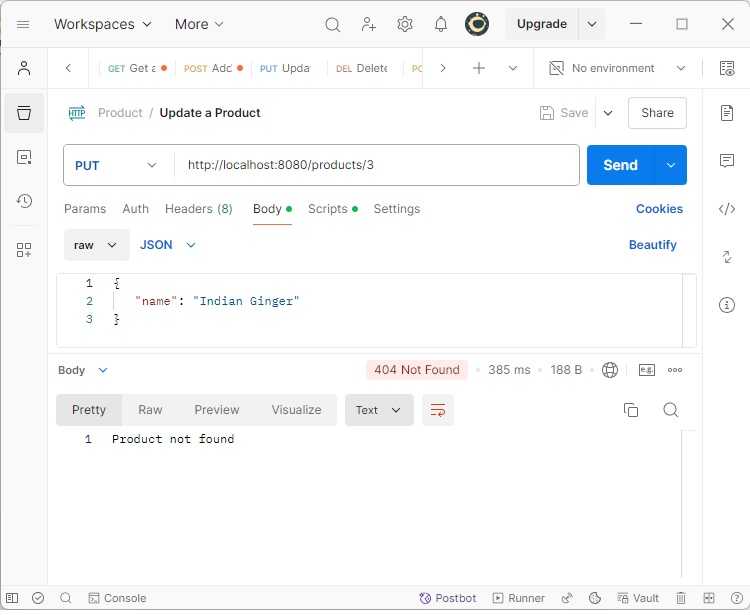
现在在 POSTMAN 应用程序中访问以下 URL,你将看到如下所示的输出 −
更新 URL:http://localhost:8080/products/3