Android - 警告对话框
Dialog 是一个小型窗口,用于提示用户做出决策或输入额外信息。
有时在您的应用中,如果您想在用户执行特定操作后询问用户“是”或“否”的决定,同时保持在同一 activity 中且不改变屏幕,您可以使用 Alert Dialog。
要创建警告对话框,您需要创建 AlertDialog.Builder 的对象,这是 AlertDialog 的内部类。其语法如下
AlertDialog.Builder alertDialogBuilder = new AlertDialog.Builder(this);
现在,您需要使用 AlertDialog.Builder 类对象设置正面(是)或负面(否)按钮。其语法是
alertDialogBuilder.setPositiveButton(CharSequence text,
   DialogInterface.OnClickListener listener)
alertDialogBuilder.setNegativeButton(CharSequence text,
   DialogInterface.OnClickListener listener)
除此之外,您可以使用 builder 类提供的其他函数来自定义警告对话框。以下是这些函数列表
| 序号 | 方法类型与描述 |
|---|---|
| 1 |
setIcon(Drawable icon) 此方法设置警告对话框的图标。 |
| 2 |
setCancelable(boolean cancel able) 此方法设置对话框是否可以取消的属性 |
| 3 |
setMessage(CharSequence message) 此方法设置在警告对话框中显示的消息 |
| 4 |
setMultiChoiceItems(CharSequence[] items, boolean[] checkedItems, DialogInterface.OnMultiChoiceClickListener listener) 此方法设置要在对话框中作为内容显示的项目列表。选中的选项将通过 listener 通知 |
| 5 |
setOnCancelListener(DialogInterface.OnCancelListener onCancelListener) 此方法设置当对话框被取消时将调用的回调。 |
| 6 |
setTitle(CharSequence title) 此方法设置对话框中显示的标题 |
创建并设置对话框 builder 后,您可以通过调用 builder 类的 create() 方法来创建警告对话框。其语法是
AlertDialog alertDialog = alertDialogBuilder.create();
alertDialog.show();
这将创建警告对话框并在屏幕上显示它。
Dialog Fragment
在进入示例之前,我们需要了解 dialog fragment。Dialog fragment 是一种可以以对话框形式显示 fragment 的 fragment
public class DialogFragment extends DialogFragment {
   @Override
   public Dialog onCreateDialog(Bundle savedInstanceState) {
      // 使用 Builder 类方便地构建对话框
      AlertDialog.Builder builder = new AlertDialog.Builder(getActivity());
      builder.setPositiveButton(R.string.fire, new DialogInterface.OnClickListener() {
         public void onClick(DialogInterface dialog, int id) {
            toast.makeText(this,"在这里输入文本",Toast.LENTH_SHORT).show();
         }
      })
      .setNegativeButton(R.string.cancel, new DialogInterface.OnClickListener() {
         public void onClick(DialogInterface dialog, int id) {
            finish();
         });
         // 创建 AlertDialog 对象并返回它
         return builder.create();
      }
   }
}
列表对话框
它用于在对话框中显示项目列表。例如,用户需要从多个项目列表中选择项目列表或点击某个项目。在这种情况下,我们可以使用列表对话框。
public Dialog onCreateDialog(Bundle savedInstanceState) {
AlertDialog.Builder builder = new AlertDialog.Builder(getActivity());
builder.setTitle(Pick a Color)
.setItems(R.array.colors_array, new DialogInterface.OnClickListener() {
public void onClick(DialogInterface dialog, int which) {
// 'which' 参数包含所选项目的索引位置
}
});
return builder.create();
}单选列表对话框
它用于在对话框中添加单选列表。我们可以根据用户选择进行选中或取消选中。
public Dialog onCreateDialog(Bundle savedInstanceState) {
mSelectedItems = new ArrayList();
AlertDialog.Builder builder = new AlertDialog.Builder(getActivity());
builder.setTitle("This is list choice dialog box");
.setMultiChoiceItems(R.array.toppings, null,
new DialogInterface.OnMultiChoiceClickListener() {
@Override
public void onClick(DialogInterface dialog, int which, boolean isChecked) {
if (isChecked) {
// 如果用户选中了该项,将其添加到选中项中
mSelectedItems.add(which);
}
else if (mSelectedItems.contains(which)) {
// 否则,如果该项已在数组中,则移除它
mSelectedItems.remove(Integer.valueOf(which));
}
}
})
// 设置操作按钮
.setPositiveButton(R.string.ok, new DialogInterface.OnClickListener() {
@Override
public void onClick(DialogInterface dialog, int id) {
// 用户点击了 OK,因此将 mSelectedItems 结果保存到某处
// 或将其返回给打开对话框的组件
...
}
})
.setNegativeButton(R.string.cancel, new DialogInterface.OnClickListener() {
@Override
public void onClick(DialogInterface dialog, int id) {
...
}
});
return builder.create();
}
示例
以下示例演示了在 Android 中使用 AlertDialog。
要实验这个示例,您需要在模拟器或实际设备上运行。
步骤
描述
1
您将使用 Android Studio 创建一个 Android 应用程序,并将其命名为 My Application,包名为 com.example.sairamkrishna.myapplication。
2
修改 src/MainActivity.java 文件,添加 AlertDialog 代码以启动对话框。
3
修改布局 XML 文件 res/layout/activity_main.xml,必要时添加任何 GUI 组件。
4
无需更改默认字符串常量。Android Studio 会自动处理 values/strings.xml 中的默认字符串。
5
运行应用程序,选择一个运行中的 Android 设备,在其上安装应用程序并验证结果。
以下是修改后的 src/MainActivity.java 代码
package com.example.sairamkrishna.myapplication;
import android.app.AlertDialog;
import android.content.DialogInterface;
import android.support.v7.app.ActionBarActivity;
import android.os.Bundle;
import android.view.View;
import android.widget.Toast;
public class MainActivity extends ActionBarActivity {
@Override
protected void onCreate(Bundle savedInstanceState) {
super.onCreate(savedInstanceState);
setContentView(R.layout.activity_main);
}
public void open(View view){
AlertDialog.Builder alertDialogBuilder = new AlertDialog.Builder(this);
alertDialogBuilder.setMessage("Are you sure,
You wanted to make decision");
alertDialogBuilder.setPositiveButton("yes",
new DialogInterface.OnClickListener() {
@Override
public void onClick(DialogInterface arg0, int arg1) {
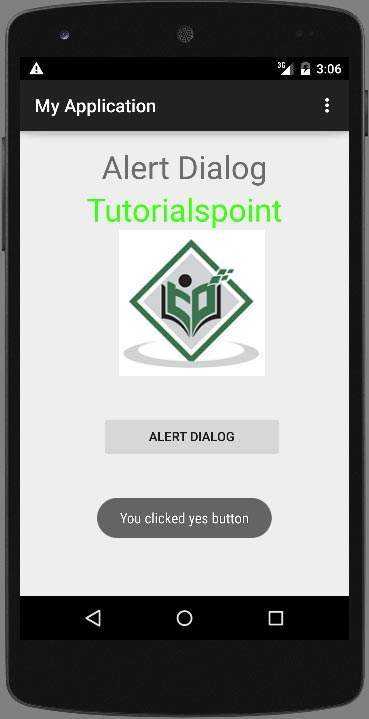
Toast.makeText(MainActivity.this,"You clicked yes
button",Toast.LENGTH_LONG).show();
}
});
alertDialogBuilder.setNegativeButton("No",new DialogInterface.OnClickListener() {
Override
public void onClick(DialogInterface dialog, int which) {
finish();
}
});
AlertDialog alertDialog = alertDialogBuilder.create();
alertDialog.show();
}
}
以下是修改后的 res/layout/activity_main.xml 代码
在下面的代码中,abc 表示 example.com 的 logo
<?xml version="1.0" encoding="utf-8"?>
<RelativeLayout
xmlns:android="http://schemas.android.com/apk/res/android"
xmlns:tools="http://schemas.android.com/tools" android:layout_width="match_parent"
android:layout_height="match_parent"
android:paddingLeft="@dimen/activity_horizontal_margin"
android:paddingRight="@dimen/activity_horizontal_margin"
android:paddingTop="@dimen/activity_vertical_margin"
android:paddingBottom="@dimen/activity_vertical_margin"
tools:context=".MainActivity">
<TextView
android:layout_width="wrap_content"
android:layout_height="wrap_content"
android:text="Alert Dialog"
android:id="@+id/textView"
android:textSize="35dp"
android:layout_alignParentTop="true"
android:layout_centerHorizontal="true" />
<TextView
android:layout_width="wrap_content"
android:layout_height="wrap_content"
android:text=""
android:id="@+id/textView2"
android:textColor="#ff3eff0f"
android:textSize="35dp"
android:layout_below="@+id/textView"
android:layout_centerHorizontal="true" />
<ImageView
android:layout_width="wrap_content"
android:layout_height="wrap_content"
android:id="@+id/imageView"
android:src="@drawable/abc"
android:layout_below="@+id/textView2"
android:layout_alignRight="@+id/textView2"
android:layout_alignEnd="@+id/textView2"
android:layout_alignLeft="@+id/textView"
android:layout_alignStart="@+id/textView" />
<Button
android:layout_width="wrap_content"
android:layout_height="wrap_content"
android:text="Alert dialog"
android:id="@+id/button"
android:layout_below="@+id/imageView"
android:layout_alignRight="@+id/textView2"
android:layout_alignEnd="@+id/textView2"
android:layout_marginTop="42dp"
android:onClick="open"
android:layout_alignLeft="@+id/imageView"
android:layout_alignStart="@+id/imageView" />
</RelativeLayout>
以下是 Strings.xml 的内容
<resources>
<string name="app_name">My Application</string>
</resources>
以下是 AndroidManifest.xml 的默认代码
<?xml version="1.0" encoding="utf-8"?>
<manifest xmlns:android="http://schemas.android.com/apk/res/android"
package="com.example.sairamkrishna.myapplication" >
<application
android:allowBackup="true"
android:icon="@drawable/ic_launcher"
android:label="@string/app_name"
android:theme="@style/AppTheme" >
<activity
android:name="com.example.sairamkrishna.myapplication.MainActivity"
android:label="@string/app_name" >
<intent-filter>
<action android:name="android.intent.action.MAIN" />
<category android:name="android.intent.category.LAUNCHER" />
</intent-filter>
</activity>
</application>
</manifest>
让我们尝试运行您的应用程序。我假设您已将实际的 Android 移动设备连接到计算机。要从 Android Studio 运行应用,请打开项目中的一个 activity 文件,然后点击工具栏中的 Run  图标。在启动应用程序之前,Android Studio 将显示以下窗口,让您选择要在哪里运行 Android 应用程序。
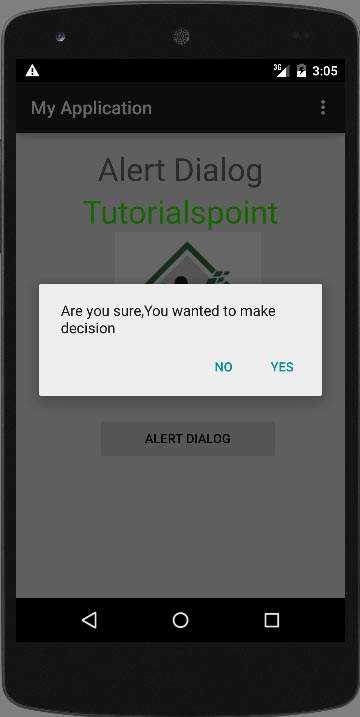
选择一个选项然后点击它。例如,如果您点击了“是”按钮,结果将如下所示
如果您点击“否”按钮,它将调用 finish() 并关闭您的应用程序。