Android - 服务
Service 是一种在后台运行的组件,用于执行长时间运行的操作,无需与用户交互,即使应用被销毁,它也能继续工作。Service 基本上有两种状态 −
| 序号 | 状态 & 描述 |
|---|---|
| 1 |
Started 当应用组件(如 activity)通过调用 startService() 启动 service 时,该 service 即为 started 状态。一旦启动,service 可以在后台无限期运行,即使启动它的组件被销毁。 |
| 2 |
Bound 当应用组件通过调用 bindService() 与之绑定时,该 service 即为 bound 状态。绑定的 service 提供客户端-服务器接口,允许组件与 service 交互、发送请求、获取结果,甚至可以通过进程间通信 (IPC) 在进程间进行交互。 |
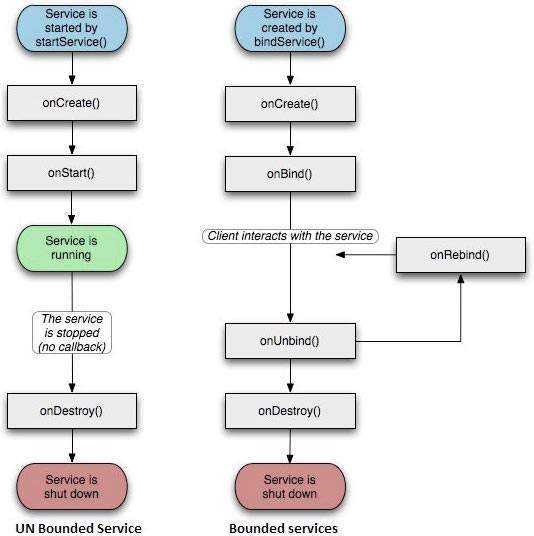
Service 具有生命周期回调方法,您可以实现这些方法来监控 service 状态的变化,并在适当阶段执行工作。左侧图示显示了使用 startService() 创建 service 时的生命周期,右侧图示显示了使用 bindService() 创建 service 时的生命周期:(图片来源:android.com)
要创建一个 service,您需要创建一个扩展 Service 基类或其现有子类的 Java 类。Service 基类定义了各种回调方法,以下是最重要的方法。您无需实现所有回调方法,但重要的是要理解每一个,并在确保应用按用户预期行为时实现相应的方法。
| 序号 | 回调 & 描述 |
|---|---|
| 1 | onStartCommand() 当另一个组件(如 activity)通过调用 startService() 请求启动 service 时,系统会调用此方法。如果您实现了此方法,则有责任在工作完成后通过调用 stopSelf() 或 stopService() 方法停止 service。 |
| 2 |
onBind() 当另一个组件通过调用 bindService() 想要与 service 绑定时,系统会调用此方法。如果您实现了此方法,必须提供一个接口,客户端通过返回的 IBinder 对象与 service 通信。您必须始终实现此方法,但如果不想允许绑定,则应返回 null。 |
| 3 |
onUnbind() 当所有客户端从 service 发布的特定接口断开连接时,系统会调用此方法。 |
| 4 |
onRebind() 在先前通过 onUnbind(Intent) 通知所有客户端已断开连接后,当新的客户端连接到 service 时,系统会调用此方法。 |
| 5 |
onCreate() 当使用 onStartCommand() 或 onBind() 首次创建 service 时,系统会调用此方法。此调用用于执行一次性设置。 |
| 6 |
onDestroy() 当 service 不再使用并将被销毁时,系统会调用此方法。您的 service 应实现此方法以清理任何资源,如线程、注册的监听器、接收器等。 |
以下骨架 service 演示了每个生命周期方法 −
package com.;

import android.app.Service;
import android.os.IBinder;
import android.content.Intent;
import android.os.Bundle;

public class HelloService extends Service {

   /** 如果 service 被杀死,表示如何行为 */
   int mStartMode;

   /** 客户端绑定的接口 */
   IBinder mBinder;

   /** 表示是否应使用 onRebind */
   boolean mAllowRebind;

   /** 在 service 被创建时调用。 */
   @Override
   public void onCreate() {

   }

   /** service 正在启动,由于调用了 startService() */
   @Override
   public int onStartCommand(Intent intent, int flags, int startId) {
      return mStartMode;
   }

   /** 客户端通过 bindService() 绑定到 service */
   @Override
   public IBinder onBind(Intent intent) {
      return mBinder;
   }

   /** 当所有客户端通过 unbindService() 解绑时调用 */
   @Override
   public boolean onUnbind(Intent intent) {
      return mAllowRebind;
   }

   /** 当客户端通过 bindService() 绑定到 service 时调用 */
   @Override
   public void onRebind(Intent intent) {

   }

   /** 当 service 不再使用并将被销毁时调用 */
   @Override
   public void onDestroy() {

   }
}
示例
本示例将通过简单步骤向您展示如何创建自己的 Android Service。请按照以下步骤修改我们在 Hello World Example 章节中创建的 Android 应用程序 −
| 步骤 | 描述 |
|---|---|
| 1 | 您将使用 Android Studio IDE 创建一个 Android 应用程序,并将其命名为 My Application,包名为 com.example.7.myapplication,如 Hello World Example 章节所述。 |
| 2 | 修改主 activity 文件 MainActivity.java,添加 startService() 和 stopService() 方法。 |
| 3 | 在包 com.example.My Application 下创建一个新的 Java 文件 MyService.java。该文件将包含 Android service 相关方法的实现。 |
| 4 | 在 AndroidManifest.xml 文件中使用 <service.../> 标签定义您的 service。一个应用程序可以拥有一个或多个 service,没有任何限制。 |
| 5 | 修改 res/layout/activity_main.xml 文件的默认内容,在 linear layout 中包含两个按钮。 |
| 6 | res/values/strings.xml 文件中的常量无需更改。Android Studio 会处理字符串值。 |
| 7 | 运行应用程序以启动 Android 模拟器,并验证应用程序所做的更改结果。 |
以下是修改后的主 activity 文件 MainActivity.java 的内容。该文件可以包含所有基本生命周期方法。我们添加了 startService() 和 stopService() 方法来启动和停止 service。
package com.example.7.myapplication;

import android.content.Intent;
import android.support.v7.app.AppCompatActivity;
import android.os.Bundle;

import android.os.Bundle;
import android.app.Activity;
import android.util.Log;
import android.view.View;

public class MainActivity extends Activity {
   String msg = "Android : ";

   /** Called when the activity is first created. */
   // 当 activity 首次创建时调用。
   @Override
   public void onCreate(Bundle savedInstanceState) {
      super.onCreate(savedInstanceState);
      setContentView(R.layout.activity_main);
      Log.d(msg, "The onCreate() event");
   }

   public void startService(View view) {
      startService(new Intent(getBaseContext(), MyService.class));
   }

   // 停止 service 的方法
   public void stopService(View view) {
      stopService(new Intent(getBaseContext(), MyService.class));
   }
}
以下是 MyService.java 的内容。该文件可以根据需求实现一个或多个与 Service 相关的方法。目前我们仅实现 onStartCommand() 和 onDestroy() 两个方法 −
package com.example.7.myapplication;

import android.app.Service;
import android.content.Intent;
import android.os.IBinder;
import android.support.annotation.Nullable;
import android.widget.Toast;

/**
   * Created by 7 on 8/23/2016.
   * 由 7 于 2016/8/23 创建。
*/

public class MyService extends Service {
   @Nullable
   @Override
   public IBinder onBind(Intent intent) {
      return null;
   }

   @Override
   public int onStartCommand(Intent intent, int flags, int startId) {
      // 让它继续运行直到被停止。
      Toast.makeText(this, "Service Started", Toast.LENGTH_LONG).show();
      return START_STICKY;
   }

   @Override
   public void onDestroy() {
      super.onDestroy();
      Toast.makeText(this, "Service Destroyed", Toast.LENGTH_LONG).show();
   }
}
以下是修改后的 AndroidManifest.xml 文件内容。在此我们添加了 <service.../> 标签以包含我们的 service −
<?xml version="1.0" encoding="utf-8"?>
<manifest xmlns:android="http://schemas.android.com/apk/res/android"
   package="com.example.7.myapplication">

   <application
      android:allowBackup="true"
      android:icon="@mipmap/ic_launcher"
      android:label="@string/app_name"
      android:supportsRtl="true"
      android:theme="@style/AppTheme">

      <activity android:name=".MainActivity">
         <intent-filter>
            <action android:name="android.intent.action.MAIN" />

            <category android:name="android.intent.category.LAUNCHER" />
         </intent-filter>
      </activity>

      <service android:name=".MyService" />
   </application>

</manifest>
以下是 res/layout/activity_main.xml 文件的内容,用于包含两个按钮 −
<RelativeLayout xmlns:android="http://schemas.android.com/apk/res/android"
   xmlns:tools="http://schemas.android.com/tools" android:layout_width="match_parent"
   android:layout_height="match_parent" android:paddingLeft="@dimen/activity_horizontal_margin"
   android:paddingRight="@dimen/activity_horizontal_margin"
   android:paddingTop="@dimen/activity_vertical_margin"
   android:paddingBottom="@dimen/activity_vertical_margin" tools:context=".MainActivity">

   <TextView
      android:id="@+id/textView1"
      android:layout_width="wrap_content"
      android:layout_height="wrap_content"
      android:text="Example of services"
      android:layout_alignParentTop="true"
      android:layout_centerHorizontal="true"
      android:textSize="30dp" />

   <TextView
      android:id="@+id/textView2"
      android:layout_width="wrap_content"
      android:layout_height="wrap_content"
      android:text=" "
      android:textColor="#ff87ff09"
      android:textSize="30dp"
      android:layout_above="@+id/imageButton"
      android:layout_centerHorizontal="true"
      android:layout_marginBottom="40dp" />

   <ImageButton
      android:layout_width="wrap_content"
      android:layout_height="wrap_content"
      android:id="@+id/imageButton"
      android:src="@drawable/abc"
      android:layout_centerVertical="true"
      android:layout_centerHorizontal="true" />

   <Button
      android:layout_width="wrap_content"
      android:layout_height="wrap_content"
      android:id="@+id/button2"
      android:text="Start Services"
      android:onClick="startService"
      android:layout_below="@+id/imageButton"
      android:layout_centerHorizontal="true" />

   <Button
      android:layout_width="wrap_content"
      android:layout_height="wrap_content"
      android:text="Stop Services"
      android:id="@+id/button"
      android:onClick="stopService"
      android:layout_below="@+id/button2"
      android:layout_alignLeft="@+id/button2"
      android:layout_alignStart="@+id/button2"
      android:layout_alignRight="@+id/button2"
      android:layout_alignEnd="@+id/button2" />

</RelativeLayout>
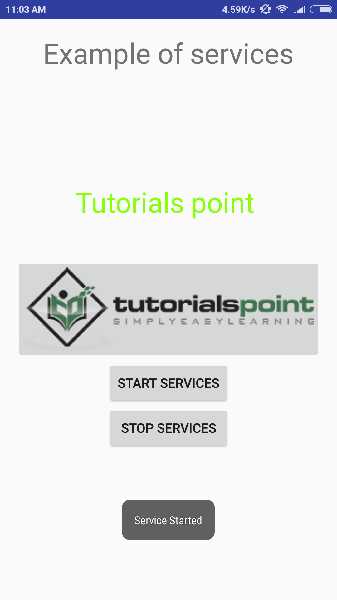
让我们尝试运行我们刚刚修改的 Hello World! 应用程序。我假设您在环境设置时已经创建了 AVD。要在 Android Studio 中运行应用,请打开项目的一个 activity 文件,然后点击工具栏中的 Run  图标。Android Studio 会将应用安装到您的 AVD 上并启动它,如果您的设置和应用程序一切正常,它将显示以下模拟器窗口 −

现在要启动您的 service,请点击 Start Service 按钮,这将启动 service,并且根据我们在 onStartCommand() 方法中的编程,一个 Service Started 消息将显示在模拟器底部,如下所示 −
要停止 service,您可以点击 Stop Service 按钮。